


Internet
Modems
Modems
To ensure proper compatibility and the best customer experience, High-Speed Internet customers MUST USE A PROVIDED RENTAL MODEM or YOU MUST PURCHASE AN APPROVED MODEM.
Approved Modems shown below are for Speeds UNDER 200Mbps download speed. Speeds at/over 200Mbps download require a Docsis 3.1 modem, which can only be rented from Blue Stream at this time.
Arris TG2472 (wireless) – Rental Only
The TG2472 offers the latest in wireless performance, with all the features of the DG2470 (below) for both high speed Internet and digital home phone products! This feature packed unit is intended to serve as the hub of the home network, connecting all IP capable devices (Internet, Data, Voice and Video) throughout the premises.
Arris DG2470 (wireless)
The DG2470 leads the future to advanced home and small office services. The DG2470 with its superior 802.11ac Dual Band Wireless radios, can deliver superior performance while also offering improvements in home coverage above that of other models. This feature-packed unit is intended to serve as the hub of the home network, connecting all IP capable devices throughout the premises.
Motorola Surfboard SB6141 (wired)
Motorola’s easy-to-use SB6141 SURFboard DOCSIS 3.0 Cable Modem unlocks the potential of innovative high-bandwidth data and multimedia services. Motorola ensures top-quality data speeds over multiple channels for many users. It is easy-to-use and compatible with Windows®, Macintosh® or UNIX® computers. Available from most local and online retailers of electronics.
Motorola Surfboard SBG6580 (wireless)
The Motorola SBG6580 SURFboard eXtreme Wireless Cable Modem Gateway is both a modem and router! It delivers ultra broadband high-speed data, high-bandwidth home networking and security, all in one device. The Motorola SBG6580 SURFboard eXtreme Wireless Cable Modem Gateway features quick download speeds with secure and reliable Wireless connectivity. Motorola ensures top-quality data speeds over multiple channels for many users. It is easy-to-use and compatible with Windows®, Macintosh® or UNIX® computers. Available from most local and online retailers of electronics.
Motorola Surfboard SB6183 (wired)
The Motorola SB6183 will help you deliver innovative, ultra-broadband data services with reliable, high-quality products. The SB6183 gives the operator the ability to offer up to 16 bonded downstream channels for high-speed data peak throughput rates. The SB6183 Cable Modem provides high-speed Internet access on the home network via a single Ethernet connection.
Internet
1 Gig Disclaimer
How fast can I go?
A 1 Gig (1 Gbps download speed) internet connection is extremely fast. The power of a 1 Gig connection is not just meant to be used on 1 device like a computer. The 1 Gig connection is meant to ensure that all the devices in your home have enough bandwidth to support their applications, streaming and downloading needs. In fact, there are very few individual computers or devices that can reach a full 1 Gig download speed on their own. Think about it like the electrical power that comes into your home. It is shared by all the lights, appliances and devices in your home. There is no one device, light or appliance that can use all the power, but you need to make sure you have enough to power all of them.
With that said, here are some of the maximum download speeds that individual devices have. These speeds are the theoretical maximums and can be limited by a number of factors including, but not limited to: home network congestion, the physical connection to the network (e.g. WiFi, wired, etc), the speed of the website or host you are connecting to, overall internet traffic, other software or applications running on the device, or viruses and spyware.
For more information click here.
Internet
Troubleshooting
- Unplug the power cord from the modem, wait 30 seconds, then plug it back in. Wait for the power, send, receive, and online lights to go steady.
The Receive light on my modem is blinking
The receive light on your modem should be steady and indicates the downstream signal has been confirmed. If the receive light is blinking it indicates a problem.
Check all the cables and make sure they are secure.
Internet
Diagrams
- Connect one end of the coax cable to the cable outlet, and the other end to the back of your modem.
- Connect the power adapter to the back of the modem, and plug the other end into the wall outlet.
- Connect your PC by plugging the Ethernet cable* into the back of the modem, and then plug the other end into the network card in your PC.
Connecting a cable modem to a computer
*Only use Ethernet or USB Cable; not both. For more information on connecting using USB, please reference the modem’s driver disc.

Internet
Protection Plan
Blue Protection Plan
Blue Protection Plan includes everything
Just $3.95 per month!
Blue Stream offers this multi-tiered solution to fully protect your computer and the wires in your home!
SecureIT Plus

Stop worrying about Internet security. With SecureIT, we’ve taken the guess work and risk out of enjoying the Internet by safeguarding your computer. Not only is your computer fully protected from the overabundance of Internet security threats, it is also optimized to provide top-notch performance!
- Anti-virus. Real-time protection against viruses, worms and Trojans.
- Anti-spyware. Protect your privacy and keep your PC trouble-free.
- Hands-free security updates. No user interaction required.
- Personal firewall. Prevent hackers from entering your computer.
- Online Internet reporting. See important details for every security threat stopped.
- Hard drive maintenance and file optimization. Ensure your PC runs at optimal performance with disk defrag software.
- Web content filtering parental controls. Restrict access to unsuitable web pages.
1 license applies to 1 computer. $1.95 for each additional SecureIT Plus license.

File Hopper Plus
FileHopper Plus provides easy, automatic, and secure backup of your important data, the things that really matter to you. Never again worry about accidental deletion of files, hard drive failure or data loss.
Protect your files from:
- Accidental deletion.
- Hard drive failures.
- Lost data from computer theft.
- Data corruption and loss from virus/software threats.
Plus:
- Use on multiple PCs or Macs.
- 5GB storage.
- Integrated 24/7 free live support.

Password Genie
Password Genie is a password manager that saves your website usernames and passwords, eliminates the need to write them down or store them in an unsecured document.
Eliminate “Forgotten Password” Hassles:
- Securely saves all your website logins and passwords.
- One-touch website auto-fill.
- Protect personal information like frequent flyer, prescription, and insurance numbers.
- Can generate hard-to-guess passwords for all your important websites.
- Use on multiple PCs or Macs.Easily imports your browser passwords.
- Integrated 24/7 free live support.
1 license pays for 5 computers.

Wire RX
Wire Rx is a maintenance plan that covers the troubleshooting and repair of all TV, Internet, and Phone wires inside your home. Avoid added repair costs on customer-owner wiring!
If you experience a problem, just call us and a local service representative will troubleshoot your problem or send out a skilled technician to quickly identify and fix the problem. Wire Rx provides hassle-free service resolution so that you can continue enjoying your Blue Stream services as soon as possible, for one low monthly fee. When you have Wire Rx, you won’t have to pay any extra hourly or incremental service charges for repairs covered under the plan:
- Unlimited covered service calls with no contracts.
- Troubleshooting and diagnosis of TV, Phone, and Internet service problems.
- Hassle-free replacement and repair of defective customer inside wiring.
- Hassle-free replacement and repair of cable jumpers, cable connectors, splitters and phone jacks due to normal wear and tear.
- Service calls due to customer education or customer owned equipment connected to your Blue Stream services.
- Confidence that if there is a problem with any service, Blue Stream will take care of it without charging a service fee.
Please see our Wire Rx Service Plan and Conditions for full details.
Wire Rx available a la carte for $2.95/month.
Some conditions/restrictions apply. Available for residential customers only.

TV
Tivo Support
How to use my TiVo
(This is a link to a PDF of our installer guide)
Detailed TiVo User Guide
(This is a link to a PDF of our full user Guide)
How to set up my TiVo Login
- Go Here.
- Select Blue Stream as your provider.
- Click Register in the navigation bar.
- Enter your account number and the last name on the account.
- Enter the contact information you would like to use for this login.
Need more help? Give us a call at 954-753-0100.
How to set up my TiVo APP
- First go to the Apple App Store or the Google Play Store for Android devices.
- Next Search for “VU-IT!”
- Download the APP.
- Enter your log-in information (Click here to set up your login information).
TV
Blue2Go
Blue2Go lets you watch some of your favorite networks and shows from the convenience of your desktop, laptop, tablet or mobile device, anywhere in the United States. Best of all, access is FREE to all Blue Stream cable subscribers.
TV
DVR
DVR not Recording
- Ensure that DVR is not filled to capacity
Power cycle the DVR (reboot)
TV
Troubleshooting
No Audio
If all channels are without audio, press the mute button on the remote control or press the volume plus (+) button. If your television has internal/external speakers, make sure the switch is on external. Check second audio setting in menu options. Ensure that the second audio setting is set to default.
No Picture
The television set is on the wrong input. Switch to the cable input using the television set’s remote control.
Black Box In The Middle Of The Screen
This is a closed caption function. Using the TV’s remote control or the buttons on the front of the TV, navigate through the TV’s menu to the closed caption settings. Cycle through ALL closed caption settings until off or disable appears.
Tinted Picture
This may be a problem with the television set. It could also be due to the red, green or blue component cables coming loose on the back of the TV and/or converter box. Check that all cables are pushed in tight.
Channels Won’t Change
Replace batteries in remote control. If the batteries are charged and the remote is working, turn the converter off for 30 seconds, and then on again.
Make sure you are pressing the cable button on the remote
Need more help? Give us a call at 954-753-0100.
TV
Pay Per View
How do I order Pay-Per-View?
Ordering is Easy!
For events (with Digital Cable):
- Simply press the “Menu” button on your remote.
- Go to the “PPV” icon.
- Go to PPV events.
- Scroll to the event of your choice, and press “OK” then press “BUY”.
- Enjoy!
For movies (with Digital Cable):
- Simply press the “Menu” button on your remote.
- Go to “PPV” icon.
- Search for a movie by title or time.
- Scroll to the movie of your choice, press “OK” then press “BUY”.
- Enjoy!
That’s all there is to it! A reminder is automatically set for the program you have ordered. A screen will appear before the start time to remind you to tune to it. And if you forget? You will not be charged for the purchase unless you tune to the channel within the designated order window.
If you need more information, or if you have a problem receiving a pay-per-view movie or special event, call us at 954-753-0100 and a representative will be happy to assist you!
TV
On Demand
How do I order an OnDemand program?
Follow the steps below:
- Tune to Channel 1 to view the main menu (or hit the VOD/On Demand button on your remote.)
- Select a category to access the listings for that category. Press OK.
- If applicable, select a sub-category to display viewing options. Press OK.
- Choose a title. Press OK.
- Scroll to the BUY button to rent a movie for the charge indicated on the screen, or the “eye” icon to vie free content. Press OK.
- Your selection will start to play.
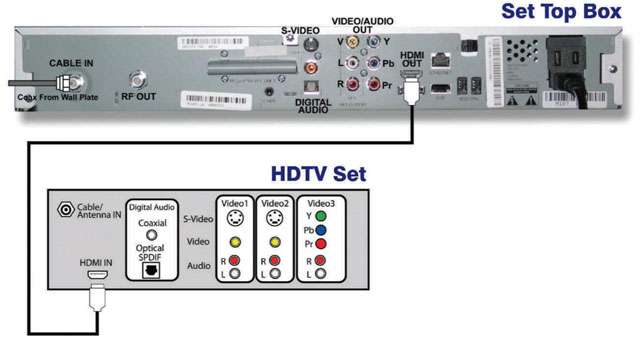
TV
Diagrams
Connecting a digital converter to an HD television via video/audio

Connecting a digital converter to an HD television with HDMI
Connecting a digital adapter/DTA to an older analog TV set
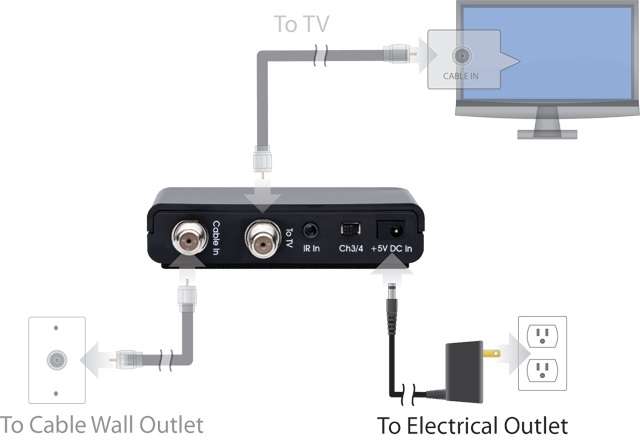
Step 1 – Connecting Digital Adapter to the cable outlet
- Find the coax cable that runs from the cable wall outlet to your TV.
- Disconnect the coax cable from your TV.
- Connect this cable to the “Cable In” port on the back of the Digital Adapter.
- Leave the other end of the cable plugged into the cable wall outlet.
Step 2 – Connecting the coax cable from the Digital Adapter to the TV
- Take the coax cable provided in your self-install kit.
- Connect one end to the “To TV” port on your Digital Adapter and connect the other end to the “Cable In” or “FR In” port on your TV.
Step 3 – Connecting the power adapter
- Take the power adapter provided in your self-install kit.
- Connect the power adapter to an active electrical wall outlet and the “=5V DC In” port on the Digital Adapter.
Step 4 – Set the channel
- Turn on your TV and tune it to channel 3.
- Make sure the channel “3/4” switch on the Digital Adapter is set to the same channel as your TV.
Step 5 – Activate your Digital Adapter
- After you have connected your Digital Adapter(s), they are ready to be activated, which will authorize your Digital Adapter(s) to begin receiving signals from Blue Stream Cable’s network.
- To activate your adapter, call us at 954-753-0100
Connecting a digital adapter to an older analog TV set – with a VCR
Step 1 – Connecting the digital adapter to your VCR
- Find the coax cable that runs from the cable wall outlet to your VCR. Disconnect the coax cable from your VCR. Connect this cable to the “Cable In” port on the back of the Digital Adapter.
- Take the coax cable provided in your self-install kit. Connect this cable to the Digital Adapter “To TV” port and to the “Cable/RF In” port on your VCR.
- Ensure coax cable is still connected from the output port on your VCR to the “Cable/RF In” port on your TV.
- Take the power adapter provided in your self-install kit. Connect the power adapter to an active electrical wall outlet and the “+5V DC In” port on the Digital Adapter
Step 2 – Set the channel
- Turn on your TV and tune it to channel 3.
- Make sure the channel “3/4” switch on the Digital Adapter is set to the same channel as your TV.
Step 3 – Activate your digital adapter
- After you have connected your Digital Adapter(s), they are ready to be activated, which will authorize your Digital Adapter(s) to begin receiving signals from Blue Stream Cable’s network.
- To activate your adapter, give us a call at 954-753-0100.
Installing the IR Extender included with the Digital Adapter

- Complete your installation of the Digital Adapter.
- Locate the IR Extender, adhesive circle and adhesive Velcro that was provided in the self-install kit.
- Plug the IR Extender into the “IR In” port on the back of the Digital Adapter.
- Place the round end of the IR Extender where your remote can “see” it. Use the adhesive circle if necessary.
- Place the Digital Adapter out of sight by attaching the adhesive Velcro to the back of your Digital Adapter and attaching it to the back of your TV.
Digital Telephone
Calling Features
Caller ID
There is a portal (URL below) available for customers to activate and deactivate phone features. To access the customer portal for phone features follow these steps:
- Start by going to the URL http://voice.myacc.net/portal/
- Provide username and password. The username will be the Blue Stream Cable Digital Telephone number. The default password will be the nine digit Blue Stream Cable Account Number (add zeros to beginning of number if contains less than nine numbers and do not include the dash).
- After providing the username and password, you may be prompted for your email address. The email address may be obtained at the time the order is placed for the phone service, however if it was not obtained, it will be required at this point. Enter the email address and click “Submit”. If you did supply an email at the time of placing your order, move down to step 4.
- Next, you will be asked to setup your Customer Proprietary Network Information (CPNI) pin. Please enter the 4 digit code you would like to use, then click “Submit.”
- Next, a password change will be required. Please fill in the current password, the new password and then verify password.
- Click Submit.
Upon login, the Features Management screen will be present. On the left hand side, there will be three menus to choose from: Basic Features, Blue Stream Features and Voicemail Management.
Voicemail Management
Voice Management allows you to specify how to handle your voice messages. Use Unified messaging if you want to use your phone to retrieve voice messages. You can also just choose to send the message to your e-mail and not use the phone for voice messaging. This feature is on by default.
To Manage via Portal:
Select “Voicemail Management” on the left-hand side.
“On” should be selected by default.
Select from the following options:
- Send all calls to Voicemail – All calls will be directed to voicemail if checked.
- Send Busy Calls to Voicemail.
- Send Unanswered Calls to Voicemail – All unanswered calls will be directed to voicemail if checked.
When a message arrives, configure the following settings:
- Use unified messaging – this feature allows you to check “Use Phone Message Waiting Indicator” (provides stuttered dial tone and/or blinking light on some phones) to indicate a message is waiting.
- Forward it to this e-mail address – an email address can be provided so the voice messages will be sent there.
Additional Settings:
- Notify me by e-mail of the new voice message at this address – an alternative email address can be provided to notify that a new message is waiting along with the caller info and the date/time of the call.
- E-mail a carbon copy of the voice message to – if a carbon copy of your messages is desired to go to another email address.
- Transfer on “0” to Phone Number – callers can press “0” during your outgoing voice message and be transferred to another number, such as a mobile phone or auto attendant. If “0” is pressed, the recording is aborted, no message is left and the caller is transferred.
- Click “Apply”. The change is effective immediately.
To Deactivate via Portal:
- Select Off. Click Apply.
The change is effective immediately
To Access Voicemail via Telephone Initially:
Dial the 10 digit phone number, or dial *62.
A prompt will play for the passcode. The default passcode is 4227 followed by #.
A prompt will play to change the current passcode. Enter a new passcode, followed by the # key. PLEASE NOTE: You cannot change your passcode to the same number consecutively (ex, 1111, 2222, etc). Likewise, you cannot change your passcode to a sequence of numbers that appear consecutively in your phone number (ex, 5121 if your phone number is 555-1212).
A prompt will play to confirm this new passcode. Enter the passcode again, followed by the # key.
A prompt will play to record the greeting. After the beep, record the greeting, then press the # key.
- If finished with the recording, press *.
- To re-record, press 1.
- To listen to the current recording, press 2.
- You are now placed in your mailbox. To clear the message waiting indicator without erasing messages, dial *99.
To Retrieve Voicemails:
A stuttered dial tone will be present if there are voicemail messages available. Dial the 10 digit phone number, or dial *62.
Enter the passcode, and press the # key.
Press 1 to access the voicemail box.
You will be advised about your new messages.
- To listen to your voice messages, press 1.
- The first message will be played, with the time and date.
- To Save the message, press the # key.
- To Erase this message, press 7.
- To Repeat this message, press 2.
- To Play the envelope, press 5.
- To go to the next message, press 6.
- To call back the caller, press 8.
- For additional options, press 9.
- To return to the previous menu, press the * key.
- If no options are picked, previously saved messages will be reviewed.
To Retrieve Voicemail from Another Phone:
Dial the 10 digit phone number, wait until the voicemail greeting starts to play, then press the * key.
Enter the passcode, and press the # key.
Press 1 to access the voicemail box.
You will be advised about your new messages.
- To listen to your voice messages, press 1.
- The first message will be played, with the time and date.
- To Save the message, press the # key.
- To Erase this message, press 7.
- To Repeat this message, press 2.
- To Play the message envelope, press 5.
- To go to the next message, press 6.
- To call back the caller, press 8.
- For additional options, press 9.
- To return to the previous menu, press the * key.
- If no options are picked, previously saved messages will be reviewed.
Aliases
Messaging Aliases allows you to enter numbers, which when called from, make your voice messaging box act as if you called from your office phone.
To Activate via Portal:
- Enter the phone number you wish to use.
- Click Add.
- Repeat as necessary.
- Click Apply.
To Delete a Number:
- Check the box under the “Delete” column.
- Click Apply.
The change is effective immediately.
Greetings
Greetings allows you to set the number of rings before reaching your voice messaging box.
To Manage via Portal:
Busy Greeting:
- System Greeting – generic greeting.
- Personal Greeting – load a file to play personal greeting.
No Answer Greeting:
- System Greeting – generic greeting.
- Unavailable Greeting – load a file to play personal greeting.
Alternative No Answer Greetings:
- Configure Greeting Name, along with uploading a file to load the alternative greeting. You can create up to three alternative greetings.
- Select Greeting.
- Number of rings before greeting – configure up to 5.
- Click “Apply”
Voicemail Password
To Reset via Portal:
- Type new password.
- Confirm new password.
- Click Apply.
Voice Portal
Voice Portal allows you to set a Personalized Name (upload a WAV file to use as your name for Auto Attendant and Voice Messaging) and set voice portal auto-login option.
To Manage via Portal:
- Select “Use Personalized Name for Auto Attendant and Voice Messaging.”
- Upload a file to provide a recording.
- If needed, select “Auto-login” to Voice Portal when calling from my phone.
Voice Message Notification
To Manage via Portal:
Login through the Customer Voice Portal.
Select “Voicemail Management” on the left-hand side.
“On” should be selected by default.
Select from the following options:
Send all calls to Voice Mail – All calls will be directed to voicemail if checked,
Send Busy Calls to Voicemail,
Send Unanswered Calls to Voicemail – All unanswered calls will be directed to voicemail if checked.
When a message arrives, configure the following settings:Use unified messaging – this feature allows you to check “Use Phone Message Waiting Indicator” (provides stuttered dial tone and/or blinking light on some phones) to indicate a message is waiting,
Forward it to this e-mail address – an email address can be provided so the voice messages will be sent there.
Click Apply.8
Voice Message To EmailTo Manage via Portal:
Login through the Customer Voice Portal.
Select “Voicemail Management” on the left-hand side.
When a message arrives, configure the following settings:
Use unified messaging – this feature allows you to check “Use Phone Message Waiting Indicator” (provides stuttered dial tone and/or blinking light on some phones) to indicate a message is waiting,
Forward it to this e-mail address – an email address can be provided so the voice messages will be sent there.
Additional Settings:Notify me by e-mail of the new voice message at this address – an alternative email address can be provided to notify that a new message is waiting along with the caller info and the date/time of the call,
E-mail a carbon copy of the voice message to – if a carbon copy of your messages is desired to go to another email address.
Click Apply.9
Anonymous Call RejectionAnonymous Call Rejection allows you to reject calls from callers who have blocked the display of their number. Only deliberate anonymous numbers are rejected. Callers whose numbers are unavailable are not rejected. Callers that are rejected are informed that you are not accepting calls from unidentified callers. Your phone does not ring and you do not receive any indication that they called. However, this does not apply to calls within your group. This feature is off by default.
To Activate via Portal: Select “On” and click “apply”. The change is effective immediately.
To Deactivate via Portal: Select “Off” and click “apply”. The change is effective immediately.
To Activate via telephone: Dial *77. The change is effective immediately.
To Deactivate via telephone: Dial *87. The change is effective immediately.
10
Automatic CallbackUse this feature if you receive a busy signal and wish to monitor the busy party (within the same call group) and automatically establish a call when the busy party becomes available.
To Use this feature: Enter the appropriate digit as prompted by phone system when you receive a busy signal.
11
Call Forwarding AlwaysCall Forwarding Always allows you to forward all your incoming calls to a different phone number, such as your cell phone. You can also make your primary phone emit a short ring burst to inform you if you are next to your phone when the call is forwarded by using the Ring Reminder. Ringer Reminder will let 1 ring play at the original telephone number, to remind you that calls are being forwarded. After the initial ring, the phone will fall silent and the call is forwarded.
This is important when you have forgotten the service is turned on and you are at your primary phone waiting to receive calls. Note that the address (phone number) you forward your calls to must be permitted by your outgoing calling plan. You can also set the phone number to forward to using the voice portal or on the phone using the feature access code. This feature is off by default.
To Activate via Portal:
Select “On” and provide the telephone number to forward to.
If desired, checkbox “Play Ring Reminder when a call is forwarded.”
Click “Apply”. The change is effective immediately.
To Deactivate via Portal: Select Off and click Apply. The change is effective immediately.To Activate via telephone: Dial *72. The change is effective immediately.
To Deactivate via telephone: Dial *73. The change is effective immediately.
12
Call Forwarding BusyCall Forwarding Busy allows you to forward all your incoming calls to a different phone number if your phone is currently busy. Use this service when you would rather have a secondary number in place to receive calls to instead of the caller being sent to your voice messaging box.
Note that the address (phone number) you forward your calls to must be permitted by your outgoing calling plan. You can also set the phone number to forward to using the feature access code. This feature is off by default.
To Activate via Portal:
Select “On” and provide the telephone number to forward to.
Click “Apply”. The change is effective immediately.
To Deactivate via Portal: Select “Off” and click “Apply”. The change is effective immediately.To Activate via telephone: Dial *90. The change is effective immediately.
To Deactivate via telephone: Dial *91. The change is effective immediately.
13
Call Forwarding No AnswerCall Forwarding No Answer allows you to forward all your calls to a different phone number when you do not answer your phone. Use this service when you would rather have a secondary number in place to receive calls to instead of the caller being sent to your voice messaging box.
The number of rings prior to forwarding can be configured here as well. You may choose none, 2, 3, 4, 5 or 6 number of rings prior to forwarding. This feature is off by default.
To Activate via Portal:
Select “On” and provide the telephone number to forward to.
If desired, select the number of rings before forwarding.
Click “Apply”. The change is effective immediately.
To Deactivate via Portal: Select “Off” and click “Apply”. The change is effective immediately.To Activate via telephone: Dial *92. The change is effective immediately.
To Deactivate via telephone: Dial *93. The change is effective immediately.
14
Call Forwarding Not ReachableCall Forwarding Not Reachable automatically forwards your incoming calls to a phone number of your choosing, when activated, if the device your phone is connected to loses contact with our Digital Voice System, such as the eMTA losing contact with Blue Stream Cable.
Note that the phone number you forward your calls to must be permitted by your outgoing calling plan. This feature is off by default.
To Activate via Portal:
Select “On” and provide the telephone number to forward to.
Click “Apply”. The change is effective immediately.
To Deactivate via Portal: Select “Off” and click “Apply”. The change is effective immediately.To Activate via telephone: Dial *94. The change is effective immediately.
To Deactivate via telephone: Dial *95. The change is effective immediately.
15
Call Forwarding SelectiveCall Forwarding Selective allows you to forward specific calls matching your pre-defined criteria to a different phone number. Use this service to forward calls from your manager, a family member, or an important customer to your cell phone, alternate business phone, or home phone. The criteria for each Call Forwarding Selective entry can be a list of up to 12 phone numbers or digit patterns and a specified time schedule.
All criteria for an entry must be satisfied for the call to be forwarded (phone number and day of week and time of day). If the call is not forwarded, the call continues as if this service was not turned on. Ring Reminder is also available with this feature. This feature is off by default. Note: This feature is only available via portal.
To Activate via Portal:
Select “On” and provide the default telephone number to forward to. Scroll down and provide:
Description for criteria, required field,
Select a time schedule,
Choose to use default number or forward to an additional number,
Choose between calls from any phone number, any private number or any unavailable number. Additionally, up to 12 specific numbers can be provided for that criteria entry.
Click “Add”. Repeat this process as needed for different call selective entries.Once call selective entry has been created, click the check box under the “active” column to activate or deactivate.
Click “Apply”. The change is effective immediately.
To Deactivate via Portal: Select “Off” and click “Apply”. The change is effective immediately.
16
Call HistoryThis feature allows you to review all incoming and outgoing calls over the previous six months. This feature can be accessed via the portal.
To Access via Portal:
Navigate to voice.myacc.net/portal.
Provide your username/password to login.
In the navigation bar, click on “Call History.”
Under the Select CDRs Criteria tab:
Filter by Calling Type: Select the type of call type you would like to view via the dropdown.
CDR Requested Date: Select the start and end date for the time frame to look for calls.
Destination #: This drop down can be used to specify the destination number to look for in the Call Detail Records.
Origination # can also be selected from this drop down menu.
Click Submit.The details tab will then be populated with the call history from the selected criteria. The history can be sorted by field and exported to a .CSV file as desired.
17
Call ReturnUse this feature to call the last party who called your number, whether or not the call was answered.
Press *69 while off hook. The previous number will be dialed.
If you wish to hear an audio playback of the number of the last caller, press *69 then option 1 when prompted.
18
Call WaitingCall Waiting allows you to receive another call while you are on the phone. You can turn it on or off for all calls and then selectively turn it back on or off using the feature access codes. This feature is on by Default.
To Activate via Portal:
Select “On” and if you choose, you can checkbox “Disable Calling Line ID Delivery on Call Waiting.”
Click “Apply”. The change is effective immediately.
To Deactivate via Portal: Select “Off” and click “Apply”. The change is effective immediately.To Deactivate PER CALL via telephone: Dial *70, then the number you wish to call while Call Waiting is canceled. Note: this process must be repeated with each additional call if you have this feature switched to “On” in the portal.
19
Inbound Calling Line Name DeliveryA caller’s name will be displayed (if available).
20
Calling Name RetrievalCalling Name Retrieval looks up the name of a caller in an external database when the name did not arrive with the original call. This is helpful to identify callers when using the CommPilot Call Manager, a phone that displays CLID information, or other call client. This feature is on by Default.
To Deactivate via Portal: Select “Off” and click “Apply”. The change is effective immediately.
To Activate via Portal: Select “On” and click “Apply”. The change is effective immediately.
21
CommPilot ExpressCommPilot Express allows you to pre-configure four profiles to control your inbound calls. These profiles can quickly be changed using the web or phone when you leave your desk or when you are at a remote location. If you use CommPilot Express, it takes precedence over some of your other service settings associated with processing incoming calls. The available profiles are “Available – In the Office,” “Available – Out of the Office”, “Busy” and “Unavailable.” This feature is off by default.
Each profile includes preferences for managing the relevant call functions, for example, Call Forwarding (Busy, No Answer, Always and Selective), Voice Messaging, Simultaneous Ringing and Call Notify. If a user elects to use CommPilot Express, it takes preference over all other service settings associated with processing incoming calls.
To Activate via Portal: Select “Profile” (Default none). Click “Apply”. The feature is available immediately.
To Manage Profiles via Portal:
Available – In the Office: Additional Options include:
Also ring to this phone number – provide number,
If Busy: Select “Have Voice Messaging take the call” or “Forward to this phone number” – provide phone number,
If No Answer: Select “Have Voice Messaging take the call” or “Forward to this phone number” – provide phone number,
Scroll down and click “Apply.”
Available – Out of the Office – Additional Options include:When a call comes in: Select “Have Voice Messaging take the call” or “Forward to this phone number” – provide phone number,
If needed, select checkbox “Also notify me by email when a call comes in” – provide email address,
Scroll down and click “Apply.”
Busy:Select “Send all calls to Voice Messaging” except calls from these phone numbers (provide up to three numbers), then move to option “Which will be forwarded to this phone number” – provide phone number,
If needed, select checkbox “Also notify me by email when a call comes in” – provide email address,
Scroll down and click “Apply.”
Unavailable:Select “Send all calls to Voice Messaging” except calls from these phone numbers (provide up to three numbers), then move to option “Which will be forwarded to this phone number” – provide phone number,
Additional options include, “Have Voice Messaging take the call using” – No Answer Greeting or Unavailable Greeting,
Click Apply.
22
Connected Line Identification RestrictionConnected Line Identification Restriction allows you to block your number from being shown when receiving a call. Members of your group can still see your number when they call you. You have the choice of turning it on or off for all calls and then selectively turning it right back on or off using the feature access codes. This feature is off by default.
To Activate via Portal: Select “On” and click “Apply”. The change is effective immediately.
To Deactivate via Portal: Select “Off” and click “Apply”. The change is effective immediately.
23
Do Not DisturbAllows you to send your calls directly to your voice messaging box without ringing your phone. In addition, you can make your primary phone emit a short ring burst to inform you when the call is being sent to voice messaging by using the Ring Reminder.
This is important when you have forgotten the service is turned on and you are at your phone waiting to receive calls. This feature is off by default.
To Activate via Portal: Select “On” and if desired, select the checkbox “Play Ring Reminder when a call is forwarded”. Click “Apply”. The change is effective immediately.
To Deactivate via Portal: Select “Off” and click “Apply”. The change is effective immediately.
To Activate via telephone: Dial *78. The change is effective immediately.
To Deactivate via telephone: Dial *79. The change is effective immediately.
24
Enhanced 911This feature automatically displays the address associated with the home phone account on the emergency dispatcher’s screen when a call to 911 is made from the phone. This feature is always active and occurs automatically whenever a call is made by dialing 911.
25
Last Number RedialUse this feature to redial the last number you called. Simply press *66.
26
Mailbox Management (Account Portal)Voice Management allows you to specify how to handle your voice messages. Use Unified messaging if you want to use your phone to retrieve voice messages. You can also just choose to send the message to your e-mail and not use the phone for voice messaging. This feature is on by default.
To Manage via Portal:
Login through the Customer Voice Portal.
Select “Voicemail Management” on the left-hand side. On should be selected by default.
27
Priority AlertPriority Alert allows you to make your phone ring with a different ring based on your pre-defined criteria. Use this service if you want to know when a specific person calls such as your manager or spouse or when you would like to easily tell when a call is from inside your group or outside your group. The criteria for each Priority Alert entry can be a list of up to 12 phone numbers or digit patterns and specified time schedule.
All criteria for an entry must be true for the phone to ring with a different tone (phone number and day of week and time of day). This feature is off by default.
To Activate via Portal:
Provide Description (to remember the configuration).
Select the following options “Use priority alert” or “Do not use priority alert.”
Select “Time Schedule.”
Select “How to filter calls”:Any phone number.
Following phone numbers “Any private number” or “Any unavailable number.”
Specific phone numbers, up to 12.
Click “Add”.
Repeat as necessary.
Once desired priority alert exists, select the “active” checkbox for the plan you wish to activate.
Click “Apply”. This change is effective immediately.
To Deactivate via Portal: Remove the active checkbox selection. Click Apply. The change is effective immediately.28
Selective Call AcceptanceSelective Call Acceptance allows you to receive only calls that meet your pre-defined criteria. The criteria for each Selective Acceptance entry can be a list of up to 12 phone numbers or digit patterns and a specified time schedule. All criteria for an entry must be true for you to receive the call. This feature is off by default.
To Activate via Portal:
Provide Description (to remember the configuration).
Select the following options “Accept Call” or “Do not accept call.”
Select “Time Schedule.”
Select “How to filter calls”:Any phone number
Following phone numbers: Any private phone number, any unavailable phone number.
Specific phone numbers, up to 12.
Click “Add”.
Repeat as necessary.
Once a profile has been created, select the “active” checkbox, and click “Apply”. This change is effective immediately.
To Deactivate via Portal: Remove the active checkbox selection. Click “Apply”. The change is effective immediately.29
Selective Call RejectionSelective Call Rejection allows you to reject calls that meet your pre-defined criteria. These callers will be given an announcement that you cannot be reached. Use this feature to prevent nuisance calls from people you would rather not talk to. The criteria for each Selective Call Rejection entry can be a list of up to 12 phone numbers or digit patterns and a specified time schedule. All criteria for an entry must be true to reject the call. This feature is off by default.
To Activate via Portal:
Provide Description (to remember the configuration).
Select the following options “Reject Call” or “Do not reject call.”
Select “Time Schedule.”
Select “how to filter calls”:Any phone number,
Following phone numbers; Any private phone number, any unavailable phone number
Specific phone numbers, up to 12.
Click “Add”.
Repeat as necessary.
Once a profile has been created, select the “active” checkbox, and click “Apply”. This change is effective immediately.
To Deactivate via Portal: Remove the active checkbox selection. Click “Apply”. The change is effective immediately.30
Sequential RingSequential Ring allows you to sequentially ring up to 5 locations in addition to the base location for a specified number of rings. There can be up to 5 locations and the feature applies to calls matching your pre-defined criteria. Use this service to ring calls from your manager, a family member, or an important customer on your cell phone, alternate business phone, or home phone.
The criteria for each Sequential Ring entry can be a list of up to 12 phone numbers or digit patterns and a specified time schedule. All criteria for an entry must be satisfied for the call to enter Sequential Ring (phone number and day of week and time of day).
The caller can also interrupt the search to leave a message. If the criteria do not match, the call continues as if this service was not turned on. This feature is off by default.
To Activate via Portal:
Add Description.
Select the following options “Use sequential ring” or “Do not use sequential ring.”
Select “Time Schedule.”
Select the call filters:
Any phone number,
Following phone numbers: Any private number, any unavailable number
Specific phone numbers, up to 12.
Click “Add”, repeat profile creation as necessary.Click the “active” checkbox for the profile you wish to use, click “Apply”.
If you wish to use the base location first, check the box. Otherwise leave empty.
Select the number of rings needed for Base Location, up to 5. Otherwise leave at default.
If you wish to continue to search if the base location is busy, select that checkbox.
If you want to give the caller the option to skip the search process, check this box.
Note: This option assumes voice messaging is available.
Provide up to 5 additional numbers to have the caller ring to. Specify the amount of rings per number that is required.
Click “Apply”. This change is effective immediately.
To Deactivate via Portal: Remove the “Active” checkbox and click “Apply”. The change is effective immediately.
31
Simultaneous Ring PersonalSimultaneous Ring Personal allows you to list up to 10 phone numbers you would like to ring in addition to your primary phone when you receive a call. This feature is helpful when you are not at your phone but you would like your cell phone to ring when you get a call. You can also turn off simultaneous ring when you are at your desk on a call. The criteria for each Simultaneous Ring entry can be a list of up to 12 phone numbers or digit patterns, a specified time schedule, and a specified holiday schedule.
All criteria for an entry must be satisfied for the call to enter Simultaneous Ring (phone number and day of week and time of day). If the criteria do not match, the call continues as if this service was not turned on. Warning: if your cell phone or other phone has voicemail that picks up before your digital phone voice messaging picks up, your voicemails could be on your cell phone messaging system! This feature is off by default.
To Activate via Portal:
Select “On” and if desired click the checkbox for “Do not ring my Simultaneous Ring Numbers if I am already on a call.”
Enter the phone numbers that should ring simultaneously with the digital phone service.
Select the checkbox if an answer confirmation is required for the numbers provided.
Click “Apply”.
To create a schedule:
Enter a description to remind you of the preferences set.
Select “Use simultaneous ring personal” or “Do not use simultaneous ring personal.”
Pick a “Selected Time Schedule.”
Specify the calls from type.
Any phone number,
Or following phone numbers: Any private number or Any unavailable number,
Specific phone numbers, up to 12 can be listed.
Click “Add”.Repeat as necessary to add additional schedules.
To set a schedule:
Click the checkbox for “active” for whichever schedule you want to be active.
Click “Apply”. The change is effective immediately.
32
Speed Dial 8Speed Dial allows you to set up to eight speed dial numbers that can be called with the push of a button. Enter the number as you would normally dial it and then just hit that number on your touch pad to call it. You can also program your speed dial using your phone and the star code for Speed Dial. This feature is off by default.
To Activate via Portal:
Choose the Speed Dial Code you wish to associate to a specific number (Code 2 – 9 are available for assignment).
Enter the phone number you wish to assign to the Speed Dial Code.
Enter a description Name.
Repeat as necessary.
Click “Apply”. The change is effective immediately.
To Deactivate via Portal:Remove the phone number(s) that you wish to remove from Speed Dial 8.
Click “Apply”. The change is effective immediately.
To Activate via telephone:Dial *74, then the number you wish to use as the code, then the phone number. Example Dial *74 3 2400006666 allows you to use code 3 for phone number (240)-000-6666.
To use the feature, dial the code for the number you wish to dial, then #. Example Dial 3#.
33
Three-Way CallingUse this feature to create a three way call. When this service is assigned, you can place a three-way call using the flash based services.
While engaged on call:
Press flash hook on phone. The initial call is placed on hold.
Enter complete phone number or extension of third party. You can press # to signal the end of the phone number.
When third party is connected, press flash hook again. All parties will then be connected in three-way call.
To drop the third party caller, press flash hook again.
If either two parties hang up, your call with the remaining party is intact. If you disconnect, the other two parties remain connected.Troubleshooting
34
No lights on the Digital Phone ModemMake sure the power cord is plugged in.
35
No Dial ToneCheck all the connections on the digital phone modem including the power cord, coax cable and phone line. Check the phone line and make sure it is plugged into the correct phone jack on the digital phone modem. Reset the Digital phone modem by pressing and holding the reset button in for 30 seconds.
36
All of my phone calls are going to voicemailCheck to make sure the Do Not Disturb feature is not active. Dial *78 to activate the Do Not Disturb feature, *79 to deactivate.
Need more help? Give us a call at 954-753-0100.
Digital Telephone
Troubleshooting
All of my phone calls are going to voicemail
Check to make sure the Do Not Disturb feature is not active. Dial *78 to activate the Do Not Disturb feature, *79 to deactivate.
Need more help? Give us a call at 954-753-0100.
No lights on the Digital Phone Modem
Make sure the power cord is plugged in.
No Dial Tone
Check all the connections on the digital phone modem including the power cord, coax cable and phone line. Check the phone line and make sure it is plugged into the correct phone jack on the digital phone modem. Reset the Digital phone modem by pressing and holding the reset button in for 30 seconds.
Need more help? Give us a call at 954-753-0100.