


TV
Tivo Support
How to use my TiVo
(This is a link to a PDF of our installer guide)
Detailed TiVo User Guide
(This is a link to a PDF of our full user Guide)
How to set up my TiVo Login
- Go Here.
- Select Blue Stream as your provider.
- Click Register in the navigation bar.
- Enter your account number and the last name on the account.
- Enter the contact information you would like to use for this login.
Need more help? Give us a call at 954-753-0100.
How to set up my TiVo APP
- First go to the Apple App Store or the Google Play Store for Android devices.
- Next Search for “VU-IT!”
- Download the APP.
- Enter your log-in information (Click here to set up your login information).
TV
Blue2Go
Blue2Go lets you watch some of your favorite networks and shows from the convenience of your desktop, laptop, tablet or mobile device, anywhere in the United States. Best of all, access is FREE to all Blue Stream cable subscribers.
TV
DVR
DVR not Recording
- Ensure that DVR is not filled to capacity
Power cycle the DVR (reboot)
TV
Troubleshooting
No Audio
If all channels are without audio, press the mute button on the remote control or press the volume plus (+) button. If your television has internal/external speakers, make sure the switch is on external. Check second audio setting in menu options. Ensure that the second audio setting is set to default.
No Picture
The television set is on the wrong input. Switch to the cable input using the television set’s remote control.
Black Box In The Middle Of The Screen
This is a closed caption function. Using the TV’s remote control or the buttons on the front of the TV, navigate through the TV’s menu to the closed caption settings. Cycle through ALL closed caption settings until off or disable appears.
Tinted Picture
This may be a problem with the television set. It could also be due to the red, green or blue component cables coming loose on the back of the TV and/or converter box. Check that all cables are pushed in tight.
Channels Won’t Change
Replace batteries in remote control. If the batteries are charged and the remote is working, turn the converter off for 30 seconds, and then on again.
Make sure you are pressing the cable button on the remote
Need more help? Give us a call at 954-753-0100.
TV
Pay Per View
How do I order Pay-Per-View?
Ordering is Easy!
For events (with Digital Cable):
- Simply press the “Menu” button on your remote.
- Go to the “PPV” icon.
- Go to PPV events.
- Scroll to the event of your choice, and press “OK” then press “BUY”.
- Enjoy!
For movies (with Digital Cable):
- Simply press the “Menu” button on your remote.
- Go to “PPV” icon.
- Search for a movie by title or time.
- Scroll to the movie of your choice, press “OK” then press “BUY”.
- Enjoy!
That’s all there is to it! A reminder is automatically set for the program you have ordered. A screen will appear before the start time to remind you to tune to it. And if you forget? You will not be charged for the purchase unless you tune to the channel within the designated order window.
If you need more information, or if you have a problem receiving a pay-per-view movie or special event, call us at 954-753-0100 and a representative will be happy to assist you!
TV
On Demand
How do I order an OnDemand program?
Follow the steps below:
- Tune to Channel 1 to view the main menu (or hit the VOD/On Demand button on your remote.)
- Select a category to access the listings for that category. Press OK.
- If applicable, select a sub-category to display viewing options. Press OK.
- Choose a title. Press OK.
- Scroll to the BUY button to rent a movie for the charge indicated on the screen, or the “eye” icon to vie free content. Press OK.
- Your selection will start to play.
TV
Diagrams
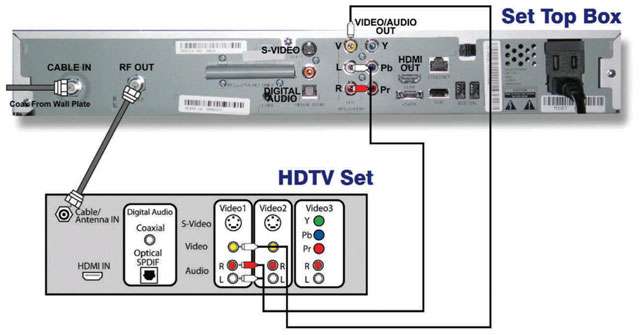
Connecting a digital converter to an HD television via video/audio
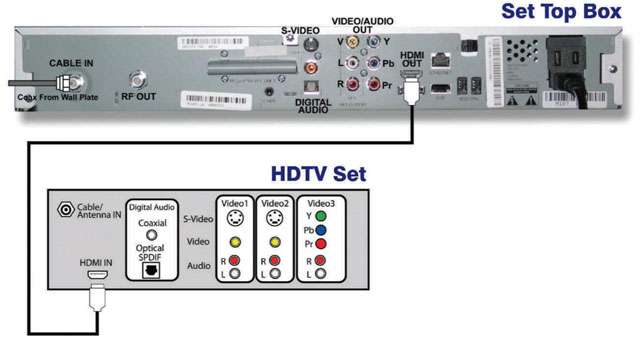
Connecting a digital converter to an HD television with HDMI
Connecting a digital adapter/DTA to an older analog TV set
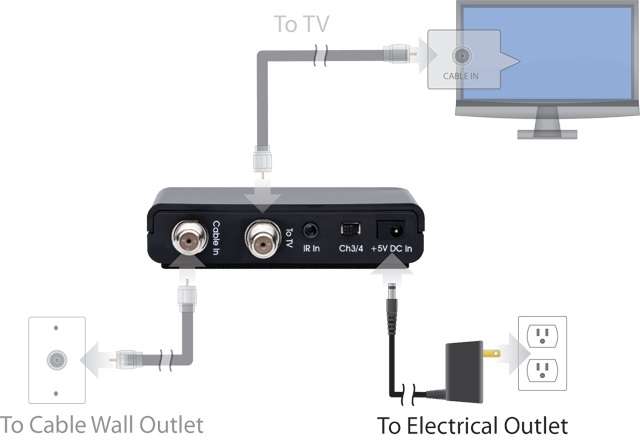
Step 1 – Connecting Digital Adapter to the cable outlet
- Find the coax cable that runs from the cable wall outlet to your TV.
- Disconnect the coax cable from your TV.
- Connect this cable to the “Cable In” port on the back of the Digital Adapter.
- Leave the other end of the cable plugged into the cable wall outlet.
Step 2 – Connecting the coax cable from the Digital Adapter to the TV
- Take the coax cable provided in your self-install kit.
- Connect one end to the “To TV” port on your Digital Adapter and connect the other end to the “Cable In” or “FR In” port on your TV.
Step 3 – Connecting the power adapter
- Take the power adapter provided in your self-install kit.
- Connect the power adapter to an active electrical wall outlet and the “=5V DC In” port on the Digital Adapter.
Step 4 – Set the channel
- Turn on your TV and tune it to channel 3.
- Make sure the channel “3/4” switch on the Digital Adapter is set to the same channel as your TV.
Step 5 – Activate your Digital Adapter
- After you have connected your Digital Adapter(s), they are ready to be activated, which will authorize your Digital Adapter(s) to begin receiving signals from Blue Stream Cable’s network.
- To activate your adapter, call us at 954-753-0100
Connecting a digital adapter to an older analog TV set – with a VCR
Step 1 – Connecting the digital adapter to your VCR
- Find the coax cable that runs from the cable wall outlet to your VCR. Disconnect the coax cable from your VCR. Connect this cable to the “Cable In” port on the back of the Digital Adapter.
- Take the coax cable provided in your self-install kit. Connect this cable to the Digital Adapter “To TV” port and to the “Cable/RF In” port on your VCR.
- Ensure coax cable is still connected from the output port on your VCR to the “Cable/RF In” port on your TV.
- Take the power adapter provided in your self-install kit. Connect the power adapter to an active electrical wall outlet and the “+5V DC In” port on the Digital Adapter
Step 2 – Set the channel
- Turn on your TV and tune it to channel 3.
- Make sure the channel “3/4” switch on the Digital Adapter is set to the same channel as your TV.
Step 3 – Activate your digital adapter
- After you have connected your Digital Adapter(s), they are ready to be activated, which will authorize your Digital Adapter(s) to begin receiving signals from Blue Stream Cable’s network.
- To activate your adapter, give us a call at 954-753-0100.
Installing the IR Extender included with the Digital Adapter
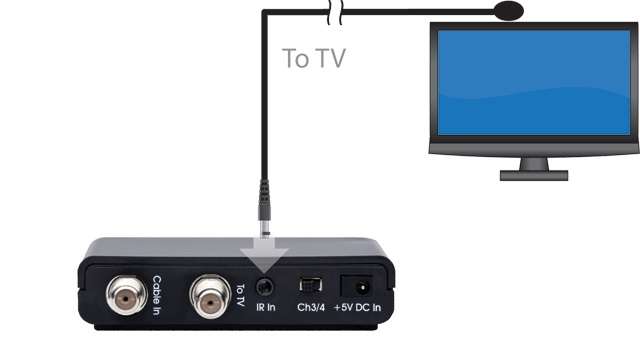
- Complete your installation of the Digital Adapter.
- Locate the IR Extender, adhesive circle and adhesive Velcro that was provided in the self-install kit.
- Plug the IR Extender into the “IR In” port on the back of the Digital Adapter.
- Place the round end of the IR Extender where your remote can “see” it. Use the adhesive circle if necessary.
- Place the Digital Adapter out of sight by attaching the adhesive Velcro to the back of your Digital Adapter and attaching it to the back of your TV.